My SAAB left the factory in 1990 with very few optional accessories. Here in Europe even turbo models were available in very basic trim: manual windows, manual mirrors, no ac, nothin! My car was originally a company car and the cost of the car alone was probably enough for them to keep the options list very short. At first this didn't bother me at all: there were less items to break and cause trouble. But at some point I changed my mind and now things are pretty much out of hands... This page is already a sad story and it keeps getting worse...
"custom" dashboard
Last Update 20th July 2003
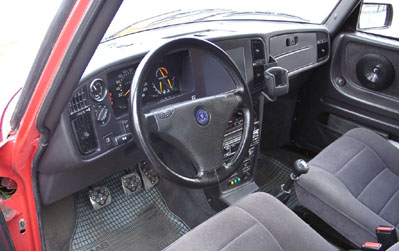
I have customized - some may say vandalized - the Saab's original dashboard quite a bit... Here's how. See below for more details. To make a long story short, I had to make room in the dash for the installation of the 8,5" LCD touch screen monitor used with the PC. This necessitated moving lots of knobs and stuff down into the center console. This project ended up as a quite a time consuming task of intensive cutting, glueing, sanding, priming and painting... The end result is - for me at least - pretty satisfactory. It did not cost really much at all, as long as I am not counting my own hours... :I Yes, it is our dining table what I was doing the sanding on. Dont tell my wife! :)
Car-PC (well, actually two of them)
Last Update 20th Jul 2003
I first got the idea of installing a PC into the car for controlling and monitoring various parameters of the engine about two years ago. I built a first-generation system, which you can see here but never had the time to actually install it into the car.
Well, we all know how fast the computers evolve... The 386SX I had built was good for monitoring things like engine temperatures and controlling boost pressure settings and such. But by now I had decided to build a system that would be usable for the in-car entertainment as well. And would not settle for just a MP3 player. But from the start I knew I had to have a system that would still do the monitoring for the engine as well and soon realized that doing that and playing DVD's with a same CPU would never work. I decided I would have to put a powerful, industry standard PC in the car to make it possible to include the features I was looking for. My initial list of requirements looked like this - and they are now implemented in the system:
GPS Navigation with electronic maps, expandable into a full-fledged navigation system (the first navigation software that properly supports Finland will be released this fall. I currently have two cd's of detailed digital maps of Finland but without directions and guidance: only GPS position plotting is supported)
Playback of MP3's. Houses a collection of all my CD's (about 200) on the hard disk
Playback of DVD videos, both from the disk and ripped into the hard drive
Television, currently with DVB (Digital video broadcasting, Digi-TV) tuner
Internet and email using the GSM mobile data
Word, Excel and other essential tools for a mobile office
Touch screen to control the operation of the PC
A LCD screen with good enough quality to watch videos, visibility for all passangers
Voice controls and speech recognition
Well, that's a long list of features. Are they really necessary in a car - well, judge for yourself. But I'm pleased with the system and I guess that's what counts. This all didn't come easy, it wasn't just that you go out and buy the hardware but the installation involved quite a bit of handcrafting as well. This was neccessary because I wanted to integrate the system into the car as well as possible. This way it does not draw too much unwanted attention and let me assure you that stealing the system would require quite a complete dissassembly of the whole car. Please do not try proving that, I would hate to start fixing the system all over again.
Update, summer 2003: The system's been working pretty nicely. I did have to change the 3,5" hard disk I originally used and replace it with a 2.5" unit designed for portable PC's. The 3.5" drive did not mind about the shocks or anything but instead it refused to work in the wintertime. I believe that either its lubrication became too thick preventing the drive at rotating the desired speed or that moisture got into the unit and froze on the disk surfaces. I have heard reports of it happening, too. The symptoms were unability to boot under cold (-10 celsius or more) conditions and occasional data corruption. The new 2.5" 30GB drive is now wrapped in an airtight bag, sealed with silicone. It seems to do a good job in keeping out the moisture and the drive does not run too warm with it. And since the new drive is smaller, there is more room to make adequate padding to protect it from external shocks.
I have replaced the TV antenna (used to be one-4-all flat membrane placed under the rear parcel shelf) with a marine omnidirectional TV antenna (looks like an ufo) from Glomex. It is placed on top of the rear parcel shelf. I painted it gray to make it less obvious. Still causes some distraction among people travelling in the car... :) Will have to take a photo for you to see soon!
Check out the CPU photos on the left I just added!
Here's just a brief list of components that I've used. What I did with them is pretty obvious if you look at the explanations and photos on the left. Feel free to email me if there's something else you'd like to know - I'll then update the info to the web as well.
Component
Model
Source
Est. cost (€/$)
A 286 PC for engine monitoring and control
Internals from a MikroMikko 3TT and a Kontron Industrial PC
Various
Not much
This 8 MHz 286 is built onto a single ISA expansion card. It sits on a passive 3-slot ISA backplane which has two more serial ports and one parallel. These are built into the same PC chassis with the Duron. The 286 is powered by a 12V DC power supply from a Kontron industrial portable. This computer draws only about 1.5 amps of power @12VDC! It boots from a single floppy disk. The monitoring program runs under Dos 6.22 and is written in Turbo C. It reads temperatures from Dallas DS1820 sensors (on a serial bus) around the car: outside, inside, pre-intercooler and post-intercooler. These values are displayed on a 20x4 LCD screen mounted in the lower center console (hooked to the parallel port). Two controls are on the console to control the operation of the intercooler fan (off, always on, on based on the intercooler efficiency %) and the settings of the boost pressure (low, high preset, or set by the in-car dial). This is all that this PC does at the moment but there is still room for expansion: the relay card I have in the engine bay has 14 unused outputs and the PC is well capable of executing more routines. Things on my mind at the moment are cruise control and automatic climate control... We'll see. At the moment I am, however, quite fed up with coding Turbo C.
In-car PC
AMD Duron 800 Mhz
various
as much as your office pc
This is a completely standard AMD Duron 800 MHz CPU on an ASUS motherboard. It has 256M ram and features a 30GB 2,5" Hard disk and a DVD drive. It is built into a mini tower case securely bolted and locked into the trunk floor. It is running Windows XP since it boots up fairly fast, tolerates power shortages nicely and has overall good application support. A linux OS wouldn't do much good since the programs I need are not available for it.
This is quite an unique product: it is a completely standard 250Watt ATX power supply - except for the fact that it runs on 12 volts DC! I neved liked the idea of putting a power inverter in the car. It has very poor efficiency, causes extra heat and radio disturbances plus it is not very safe to have 230volts AC in a car. So this is a perfect product for the purpose - but yes, the price is quite steep. I ordered it directly from Key Power in USA.
This is one nice piece of hardware. A 8.4" TFT color LCD monitor with resistive touch screen. Enclosed in a nice and compact metal casing that was easy to embedd into the dashboard. It has standard VGA input (at 800x600) and serial port for the touch screen. It runs straight on regulated 12VDC. It has a good contrast and brightness (250cd) so it is readable even in sunlight. The only downside was the price: it was pretty steep. But since it's been almost a year since I bought it I believe the prices have gone down considerably. Ask Flatvision, they have a very good customer service.
A standard Garmin GPS receiver with car craddle and a cable for connecting it to 12 volts power and PC serial port. The PC map software receives the position information from Garmin using the NMEA protocol. I built a mechanism which raises the GPS from inside the dashboard with a click of a switch. When in the "hidden" position the GPS is invisible and completely safe inside the dash. This mechanism was built using parts from two old inkjet and dot matrix printers and some relays and microswitches. It was a PITA project but the result is quite ok. I can take the GPS with me on a hike whenever I feel like it. The GPS uses an external antenna built into the roof cellphone antenna (not installed yet, currently very poor signal reception with the built in antenna).
DVB / Digi-TV Tuner
Kiss Satdem PCI and a marine TV Antenna from Glomex
The Kiss Satdem is a PCI-bus DVB tuner which has quite a descent picture quality (well, usually perfect, since it is a digi-tv). It is connected into a flat TV antenna from One4All. The antenna is hidden inside the cabin - would never install those US-limousine style wings on my hatch! :) This TV DEFINITELY works when the car is on the move, no matter what is recommended about traffic safety.
I bet you are all familiar with these programs. WinDVD does a good job in playing DVD's both from the DVD drive and the ones ripped to the 40GB hard disk (well, there are other programs to do the ripping but that's not what this site is about). WinAMP has access to my entire cd collection (about 200 CD's) in MP3 format. The hard disk housing all this data is dampened inside the PC chassis so that it runs well despite the vibrations of a moving car.
This is currently the only speech recognition package supporting finnish so there wasn't much to choose from. It works quite well in taking commands for operating the PC but the speech recognition for dictating purposes sucks big time. Will have to keep on teaching it on my home PC before it will really be useful in car. But it makes for a nice toy anyway!
Minor interior details
Last Update 30th Jul 2002
The installation of the Car-PC necessitated some other changes into the interior of the car. These were done either to improve the ergonomics and comfort of the passangers or simply to give room for installing the monsta PC parts into the car.
Component
Model
Source
Est. cost (€/$)
A new center console
Cannibalized standard console and lots of time
80.- for the leather job
The installation of the screen into the dash where the radio and the heater controls used to be necessitated building a new center console that would have room for both the heater controls and the radio. I decided to modify a standard Saab console. The fabric-covered lower part remains standard but the plastic part in the front/up is severely modified. Actually I started by cutting it into several pieces. I experimented with the new form by taping the pieces into a cardboard silhouette. As soon as I was happy with it I made a new frame for the console from aluminium and then glued or screwed the pieces of the old console into it. The new console was to have a straight shape instead of the indented one of the standard console. I then treated the newly shaped frame with about one can of glass fiber cement. After lots of hand-grinding I was happy with the result. Took the console for a professional who covered it with genuine black leather. I hand made the front panel from ABS plastics painted silver. The heater controls are from a next-gen Saab 900 (1995). They are wired so that they're all working. The pneumatic heater controls are there as well. The heater valve control was the trickiest part since the heater valve in a 900 is actuated by a solid axle. The newer 900 panel uses a cable wire. I had to build the mechanics to translate the movement of the wire into the angle of the axle. Did this with parts from a scrapped Saab 99 which has a rotating temperature knob moving a wire: now it works in reverse but does the job! Note the 4-position heater fan speed control: I actually realized by reading the Saab 900 electrical manuals that there are 4 possible speeds for the standard fan even though there are only 3 available in the standard switch: the fourth speed (full speed without any resistors in serial, even the 3rd speed has a resistor) is available in standard climate control panel only by turning the pneumatic control into the "full speed to the sides, with recirc on" position: now that same speed is usable in all the positions.
Power mirror controls
Vandalized standard switch
There was no longer room for the mirror switches in the dash. Now there's only one switch on the driver's door. It has a rocker switch on it which is used to select the left or right mirror. Now these both are controlled by only one switch, as in most modern cars.
Height adjustable passanger seat with adjustable heating
Parts from a spare driver's seat
This modification is highly recommended: I have always felt that the seating position in the passanger seat is not optimal Since only the driver's seat comes with height adjustment as standard there's nothing you can do about it. ...oh but there is! The height adjustment mechanism is fully transplantable from the driver's seat into the passanger seat. And even the holes for mounting the modified passanger seat into the floor are there. This is only natural since in the UK cars the driver sits on the right. So all you need is a spare driver's seat to donor the lower rails and the mechanism comes with them. The seat position adjustment handles are interchangeable from left side to the right so it looks completely stock.
And while you're at it, consider transplanting the PTC thermistor from the driver's seat pad into the passanger seat. And replace the on-off thermostat in the seat with a jump wire. This makes it possible to add the adjustable rheostat heater in the passanger seat as well. I did this and added a second rheostat in the center console, next to the driver's one moved from the upper dash. Now both front seats are height adjustable and with heater controls.
Turbo meter positioned where the light switch used to be
Turbo meter from Equus
This is a very common trick: the hole where the light switch used to be is a perfect place for the turbo boost gauge. It is almost a direct fit. But I did wan't to keep the light switch too, and so I modified the dash fascia so that there were two openings left to the instrument cluster. The upper one for the gauge, the lower one for the light switch. Since I fabricated the dash panel myself this now looks as stock as it can be.
Audio system
Last Update 20th July 2003
In my opinion an adequate audio system is a neccessity. Mine originally came with a lame Panasonic deck. I swapped it with the Clarion head unit I had and bought a set of new speakers. That was good enough for the start, but I soon ended up buying more stuff... Here's what I have now. At the moment I feel the system is complete. Yep, a subwoofer is still missing: I prefer rock music which, in my opinion, doesn't need that extra kick.
Update, summer 2003: My old and well-served Clarion finally had to go. It sort of blew up. I should have used that relay on the tripping wire of the electric antenna... Well, fortunately I found a good deal on a top-of-the-line Blaupunkt unit which had just been replaced by a newer model (with no features I was looking for in any case). The old 6-disc Clarion changed had to go as it was not compatible with the Blaupunkt. Some may also ask what I would need the lousy 6-disc changer for as I have now about 300 cd's in MP3 format in the hard disk of the car PC.
This used to be the top of the line model in Blaupunkt's lineup of 2002. It was replaced with a newer CD72 in 2003. I found a very good deal on this unit through a German internet shop. The delivery was prompt and the product's been working exceptionally well. This Blaupunkt has many neat features such as a microphone-based auto adapting equalizer and road noise based equalization and auto volume control. The head unit is powering the front speakers.
This is a neat piece of PC hardware from Creative Labs. The Soundblaster Extigy is essentially a SB Live sound card which is connected to a PC through the USB interface. It has neat features such as a remote controller and on-board Dolby Digital decoder. It is very well suited for the car installation as it is powered by a 12V source and the remote location in the dash minimized the distortion to the line level signal cables between it and the head unit. The Extigy connects to the line-in of the Blaupunkt. Its remote controlled can be operated from any seat in the car and it can be used to select MP3's, for example, using the Creative Playcenter app which came with the Extigy. Well worth the money for the purpose! I must say, though, that the Dolby Digital 5.1 sound is not very useful in the car. I have currently wired only two stereo channels into the amp.
I bought this amp used, but it does a good job powering the rear speakers. I've installed it under the rear seat, on the right hand side. There's a bracket there which needed a little hammering before the amp fit there. I've wired the amplifier with 6 sq-mm power directly from the battery. Speaker wires are 4 sq-mm. I'm not one of those guys paying €10/meter for wire: I prefer the cheap standard stuff.
6x9" 3-way speakers that I have installed in the rear shelf. They will not fit the original holes not in the shelf itself, but despite that the shelf is still easy to remove with speakers on it: I've installed banana connectors in the cables. These speakers sound quite good, they were very cheap because I got them from a friend working for the distributor.
2-way 5" component system with passive crosover network. I had been thinking about installing another pair of speakers to the front for a long time, but finally the installation of electrical windows freed up some space in the doors. The woofers are placed where the window knob was and the tweeters are embedded into the armrest. The speakers are powered by the head unit. I'm very pleased with the result!
Dashboard (the first evolution, now replaced with the mutant-PC-dash)
Last Update 1st Dec 1999
I bought a Benefon IO mobile phone and fell in love with its aluminium finish (the one in the picture is a Nokia 9110 Communicator which I painted myself later). The phone is made of plastic, of course, but it still looks very good. I got the idea of remanufacturing SAABs dash panels from stainless steel. I made a CAD model of the panels by digitizing the fascia panels (got them from a salvage yard) with a scanner. Then I had them laser-cut from 0.3mm stainless steel. I finished the panels with matt spray lacquer and glued them into the place: it looked very nice! The nasty surprise came with the winter: as the temperature fell well below zero the steel didn't react to it like the plastic fascia did: the dash became wavy... I realized that the replacement panels would have to be made of plastic, too. Because I didn't want to bother my father's works with another cutting job I decided to try it myself. The parts list very much explains everything... It took me about two days to finish the job - some patience was needed as I made a fatal mistake in the final stages and had to redo all the cutting (only once) again! And after finishing with the panels I painted the steering wheel handles to match as well...
The panel looked quite nasty before painting: it was originally yellow! This material is a bit tricky to handle: it does break quite easily as the seams get narrow (the most difficult parts of the dash are about 3mm wide)
These were a good buy: the form of the panels would be quite impossible to follow with standard scissors. The angled tip makes cutting arches very easy and the scissors are powerful enough to cut the thick plastic. I didn't even get blisters!
Circular cutter
10.-
Drill-mounted. It is freely adjustable so that I was able to make the round holes to the exactly right size.
Paints
One silver spray can, one matt lacquer
10.-
After cutting the pieces and making sure they're the right size I first painted them silver and then gave them a matt finish with the lacquer. I'd say the result is quite nice: You really can't tell that the panels are just painted plastic and they fit quite nicely. A few people have asked me where they could get these, but I've been very quiet: I guess not too many people would be willing to pay me the price of, let's say, 20 hours at $50 a hour...
Cellular phone mount
Last Update 15th May 2001
This is a very minor detail and wouldn't have bothered telling you about it until I received emails from several people asking where they might get a mount like this. Unfortunately it is not available anywhere, but was in fact made by my father for my previous Saab that I had bought from him. It is hand-made (cut with metal scissors and bent with simple tools) from aluminium and then painted black. The beauty in this one is that it is very ergonomical: the phone is right where I want it to be, safely not too far away from where you should keep your eyes on when driving. It is very stable and yet mounting it does not require drilling any visible holes in the dash! All the mounting screws go either behind the glovebox door or underside of the dashboard. I bet these photos talk for themselves. No, the design is not patented so feel free to make one for your Saab! :)
Leather steering wheel and shifter
Last Update 3rd March 2001
Ever since I bought the Saab I had wanted a leather steering wheel. It is really that much comfortable in use, especially in the wintertime. I would not wan't to get a cheap looking "performance" steering wheel from a speedshop. I rather wanted an original Saab product. I even knew the specific model I was looking for! It turned out to be very difficult to locate... Fortunately Neo Brothers happened to have the wheel in stock. It came standard in the latest -92 on 900 Aeros in the UK. It is a 3-spoke design quite similar to the standard steering wheel, but with a thicker circle in black leather. Installation was a simple replacement of the original. I also bought a gear knob and gaiter made of black leather, these are standard Saab parts too, to go with the new steering wheel. No more uncomfortable, cold plastics to handle in the winter!
My car didn't have an AC as these are actually very rare up here in Finland. The air conditioning has traditionally been an optional accessory selling for as high as €/$2000 extra to the list price. Only in the past few years it has become a cheap option or even standard feature for mid-priced cars. Well, to be honest, our climate doesn't pamper us with a weather where AC is an absolute must for more than a week or two in a year. Of course it is very useful after you've left your car sitting in the sun or when its very moist outside. I was looking for used system I could install into my Saab, but without very much luck. As the AC's on classic 900's are very rare around here I was only able to find very old wrecks with rotten parts. The another alternative, buying an accessory system from the dealer for €/$1800 wasn't too tempting, either. I decided to look for the parts from the US where AC has been standard accessory for years. I talked to John at Saab Savior in Crestwood, KY. He was willing to sell all the required parts for a reasonable price. The shipping costs were of course considerable, but after all I now have an AC installed for about half the dealer price.
My parts came from a 900 of the same year as mine. John at Saabsavior did a good job including all the little bits and pieces I needed: shopping the missing parts from a dealer would result in an incredible price increase. I got a rebuilt compressor, and a new receiver dryer. Other parts were in good condition and required only a through flushing with mineral spirits and vacuuming before installation. I did buy a new expansion valve just to be safe. At our local Saab dealer's parts desk the price would have been a whopping €/$100! A local AC shop sold me a similar valve under Diavia label for €/$20! The installation was quite straightforward but it took me two days (It was a kind of a therapy project, so I wasn't in a hurry). I must say it would have been very difficult without a proper instructions manual: A very kind fellow Saaber sent me a copy of the original installation manual for the accessory AC. It was very detailed and made the job a lot easier. Installing the system doesn't require you to, unlike in most modern cars, dissassemble the whole dash. The evaporator is installed from the engine compartment into the place previously used by the pollen filter. You'll have to remove the dash kick panel to install a thermoswitch and a solenoid valve there, but that's not too difficult. Bolting on the pulleys and brackets onto the engine block takes some patience (and small hands) but is doable. I installed all the parts except for the rec-dryer and went to a professional shop to have it filled with R-134a (made an instant conversion as I had only new / flushed parts). My visit to our local Autotalo Laakkonen proved to be another funny experience, but will not discuss it here in detail. Mail me if you wan't to hear another funny story about their customer service. I had the system filled by Autojen Kylmälaite in Veromies, Vantaa - I recommend their shop. As I'm writing this the system has worked for about a month and is still blowing cold. I was a bit worried about using old parts (hoses especially) with R-134a, but it seems that I did a good job replacing and sealing all the new green o-rings and that I had a good luck with the used parts I got from Saabsavior.
Power mirrors and windows
Last Update 3rd March 2001
My car originally came with manual windows and mirrors. In my opinion the power adjusted mirrors are totally useless, but got them very cheap with the window motors, so why not... The power windows became a neccessity as I decided to install speakers into the doors. The speakers were to be installed where the window cranks originally were. Installing the window regulators and mirrors was a bolt-on task: the only extra part needed (in addition to window regulators, complete mirrors and control switches) was the wiring from engine compartment to the doors: it's not preinstalled. The dash is prewired for the switches. Instead of the standard window control panel in the center console I used older window switches from a Saab 900 '80 (or something): they're separate and very small (just like the standard window defrost switch and like). This enabled me to install them into the console in such a way that the handset for my cellular car kit still fit in the console. I vandalized one fascia panel from a wrecked Saab to facilitate easy and original looking mounting holes for the switches in the console.
Got these together with my AC parts from Saab Savior. Bolt-on installation in a few minutes. I don't see why most repair manuals tell you to completely remove the window glass before replacing the regulators: I find it much easier and very safe to use thick plastic tape (3 long pieces or so) that go over the top window frame and hold the glass up while loosing and replacing the regulator.
Window motors
Standard (Bosch part)
A fellow Saab enthusiast
50.-
The motors I got were very cheap (the OEM parts price is around $200 each!) and I had to open the other of them and replace the nylon gear to make it quiet again. The motors are permanently sealed, but it's very easy to drill away the mounting points and remove the cover. Even all the parts inside come loose: the nylon gear and axle can be separated by carefully hammering out the axle. Even though the mechanism is very simple it requires quite precise adjustment to work quietly and efficiently: there's an adjustment screw at the end of the motor axle (accessible without opening the cover) that is used to control the free play in the main axle. If your motor has became noisy it will probably heal just by turning in that screw a round or so.
Many people say that this particular Bosch motor is virtually undestructible (at least beyond an easy repair) and it really pays off to look inside before replacing it for that incredible cost!
BTW: I burned a motor and replaced it with a new one from Neo Bros in Jan 2001. The cost was, to my surprise, only about €/$ 100.
Power mirrors
Standard
A fellow Saab enthusiast
50.-
These were a little faded so I decided to paint the plastics red. Cleaned the surface throughly, applied plastic primer (Herbert's Plastic Primer in a spray can), color-matched red spray paint and then several layers of clearcoat. I did the same to my manual mirrors almost two years ago and they still look very good. I'd say it's all about doing the preparations carefully: if you paint these without properly cleaning and priming the plastic you'll probably end up with very ugly looking dented mirrors after just one winter!
Heated mirrors were standard in -88 on 900's sold in the States. They were not commonly available for the 900 in Europe. Many Saab 9000's, however, had them and it happens to be so that the mirror lenses are exactly the same in these two cars. I bought the 9000 mirror lenses from Neo Brothers in the UK. They are a direct fit and the installation consisted of only connecting one extra wire which was terminated in a single connector in the front wheelwell. Wired this way, the mirror heaters are active while the rear window defroster is in use. The heat elements do a very good job in drying moist or frozen mirror lenses. This feature really should have been standard on all 900's...